Normal mapping: Difference between revisions
Justin113D (talk | contribs) Added page |
Justin113D (talk | contribs) m Fixed headings |
||
| Line 1: | Line 1: | ||
Normal mapping, also known as “bump mapping”, is a texturing technique used for altering surface normals and allow for more complex interaction with lighting and other rendering features. | Normal mapping, also known as “bump mapping”, is a texturing technique used for altering surface normals and allow for more complex interaction with lighting and other rendering features. | ||
== What are normals? == | === What are normals? === | ||
Fundamentally, normals are directions stored as unit-vectors ({x,y,z} coordinates that have a distance of 1 to the origin {0,0,0}). These are stored on vertices, triangles and/or triangle corners (also known in blender as a “split” or a “loop”) and specify which direction said element is pointing in. | Fundamentally, normals are directions stored as unit-vectors ({x,y,z} coordinates that have a distance of 1 to the origin {0,0,0}). These are stored on vertices, triangles and/or triangle corners (also known in blender as a “split” or a “loop”) and specify which direction said element is pointing in. | ||
| Line 8: | Line 8: | ||
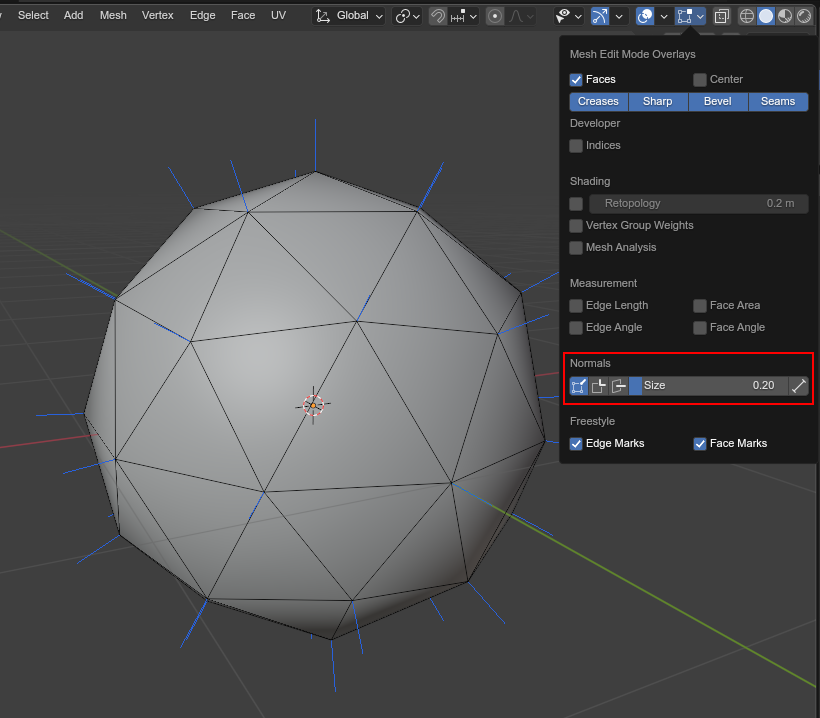
[[File:Normal mapping blender display.png|center|frame|A mesh in blenders edit mode with vertex normals visualized]] | [[File:Normal mapping blender display.png|center|frame|A mesh in blenders edit mode with vertex normals visualized]] | ||
== Example use case: Sunlight == | === Example use case: Sunlight === | ||
Normals have a variety of use cases, and in the case of 3D rendering, one big use case is “Lighting”! The most simple form of lighting can be achieved using a “sunlight”: A light that, at its core, is just the direction in which the light “travels”. | Normals have a variety of use cases, and in the case of 3D rendering, one big use case is “Lighting”! The most simple form of lighting can be achieved using a “sunlight”: A light that, at its core, is just the direction in which the light “travels”. | ||
| Line 80: | Line 80: | ||
|} | |} | ||
=== Tangent Space === | ==== Tangent Space ==== | ||
{{Notice|type=note|content=This is a highly technical topic and you may not need to read it.}} | {{Notice|type=note|content=This is a highly technical topic and you may not need to read it.}} | ||
Normal maps come with a big issue: What is considered “up/down” and “left/right”? All we know without a doubt is that “forward/backward” is based on the normal that we want to add to, but how do we correctly apply the normal map? | Normal maps come with a big issue: What is considered “up/down” and “left/right”? All we know without a doubt is that “forward/backward” is based on the normal that we want to add to, but how do we correctly apply the normal map? | ||
| Line 96: | Line 96: | ||
Older games may have used normals that depended on the non-standard tangents, and can thus look weird after importing. Unfortunately, blender supports no way of importing tangents or modifying them beyond being calculated. | Older games may have used normals that depended on the non-standard tangents, and can thus look weird after importing. Unfortunately, blender supports no way of importing tangents or modifying them beyond being calculated. | ||
== Creating normal maps == | |||
There are 2 primary ways by which normal maps are created: | There are 2 primary ways by which normal maps are created: | ||
=== Height mapping === | |||
Height maps are exactly what the name implies: a texture depicting a height. We can use such a height map to generate a normal texture: | Height maps are exactly what the name implies: a texture depicting a height. We can use such a height map to generate a normal texture: | ||
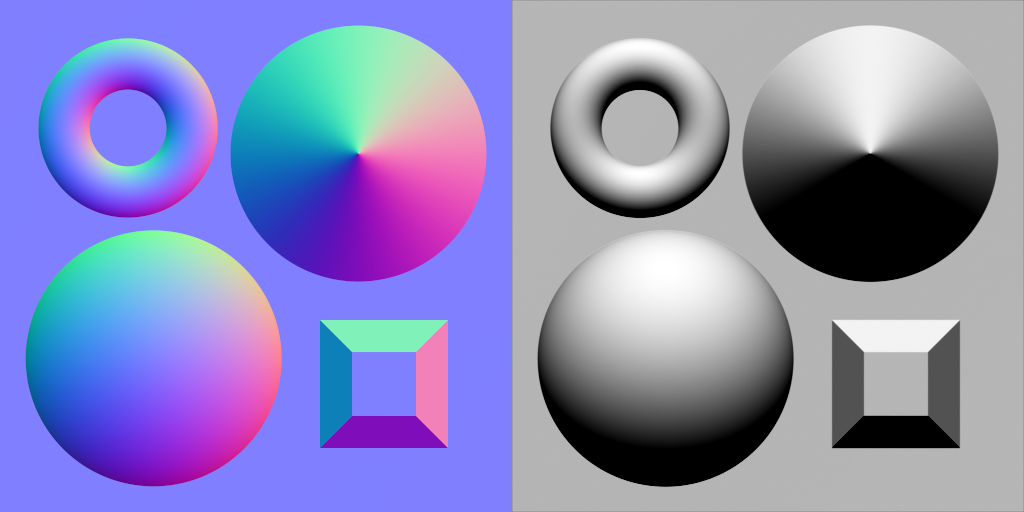
[[File:Normal mapping heightmap.png|center|frame|A height map image and a the corresponding normal map generated from it]] | [[File:Normal mapping heightmap.png|center|frame|A height map image and a the corresponding normal map generated from it]] | ||
| Line 111: | Line 111: | ||
You can even use heightmaps in blender directly using the [https://docs.blender.org/manual/en/latest/render/shader_nodes/vector/bump.html Bump node]. | You can even use heightmaps in blender directly using the [https://docs.blender.org/manual/en/latest/render/shader_nodes/vector/bump.html Bump node]. | ||
=== Baking === | |||
Blender and other 3D software provide a feature called “texture baking” with which you can project normals from a more detailed mesh onto a simpler one and save it to an image. | Blender and other 3D software provide a feature called “texture baking” with which you can project normals from a more detailed mesh onto a simpler one and save it to an image. | ||
You can read more about texture baking in blender [https://docs.blender.org/manual/en/latest/render/cycles/baking.html here]. | You can read more about texture baking in blender [https://docs.blender.org/manual/en/latest/render/cycles/baking.html here]. | ||
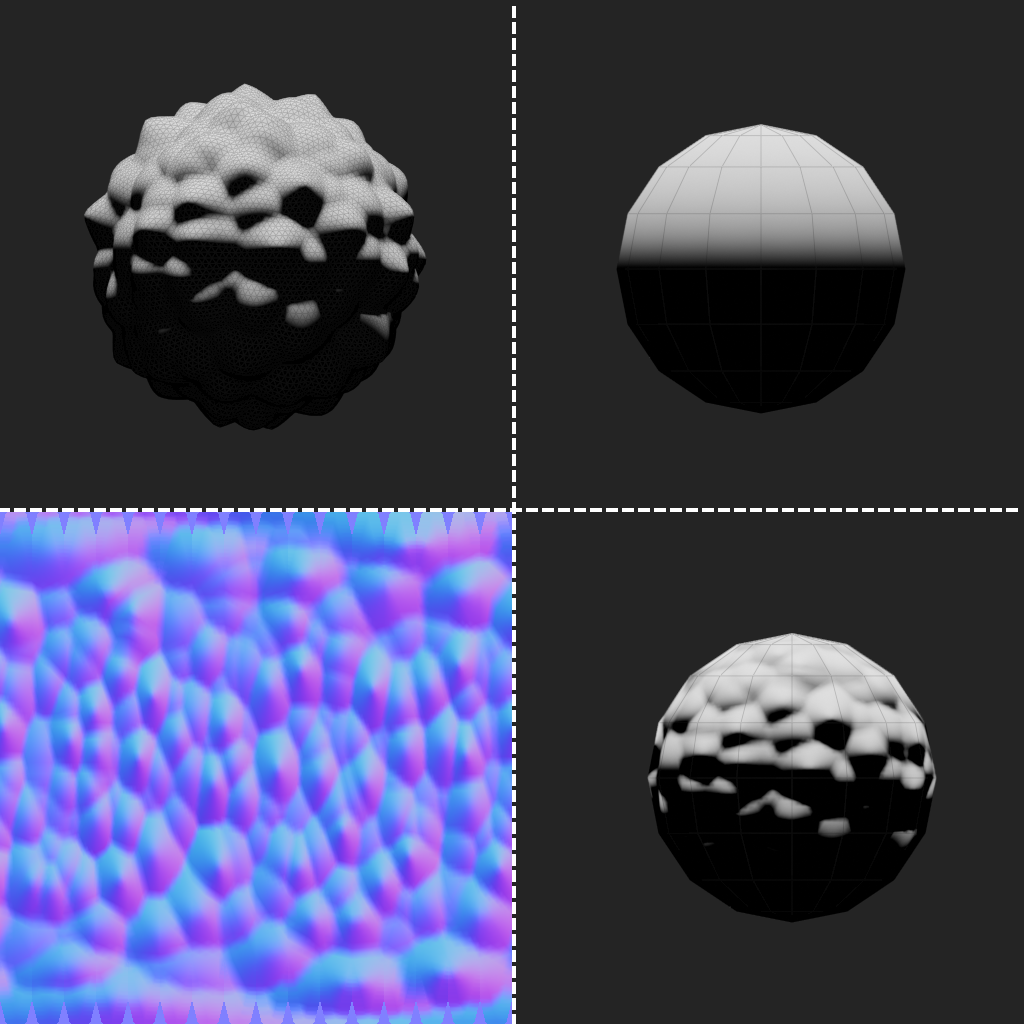
[[File:Normal mapping baking.png|center|frame|A detailed mesh (top left), a low poly sphere (top right), the normal map that was baked from the detailed mesh onto the low poly sphere (bottom left) and the low poly sphere with the normal map applied (bottom right)]] | [[File:Normal mapping baking.png|center|frame|A detailed mesh (top left), a low poly sphere (top right), the normal map that was baked from the detailed mesh onto the low poly sphere (bottom left) and the low poly sphere with the normal map applied (bottom right)]] | ||
Latest revision as of 19:44, 11 July 2025
Normal mapping, also known as “bump mapping”, is a texturing technique used for altering surface normals and allow for more complex interaction with lighting and other rendering features.
What are normals?
Fundamentally, normals are directions stored as unit-vectors ({x,y,z} coordinates that have a distance of 1 to the origin {0,0,0}). These are stored on vertices, triangles and/or triangle corners (also known in blender as a “split” or a “loop”) and specify which direction said element is pointing in.
You can visualize these in blender while in edit mode by enabling any of the "Normals" checks in the mesh edit overlay:
Example use case: Sunlight
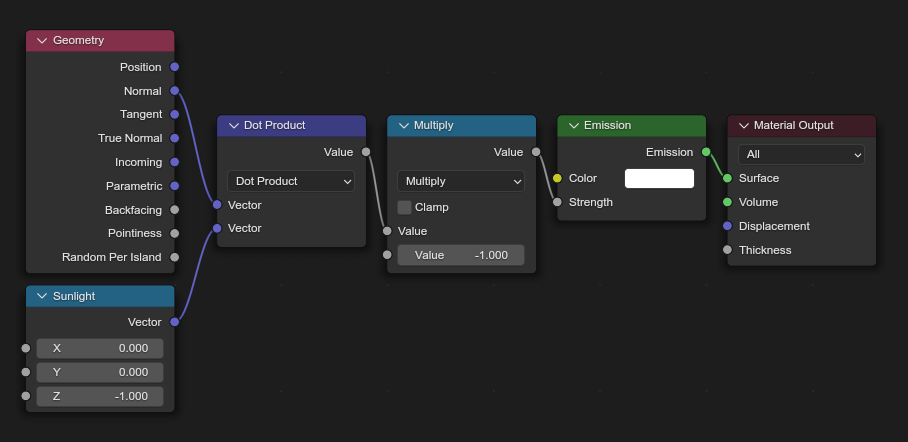
Normals have a variety of use cases, and in the case of 3D rendering, one big use case is “Lighting”! The most simple form of lighting can be achieved using a “sunlight”: A light that, at its core, is just the direction in which the light “travels”.
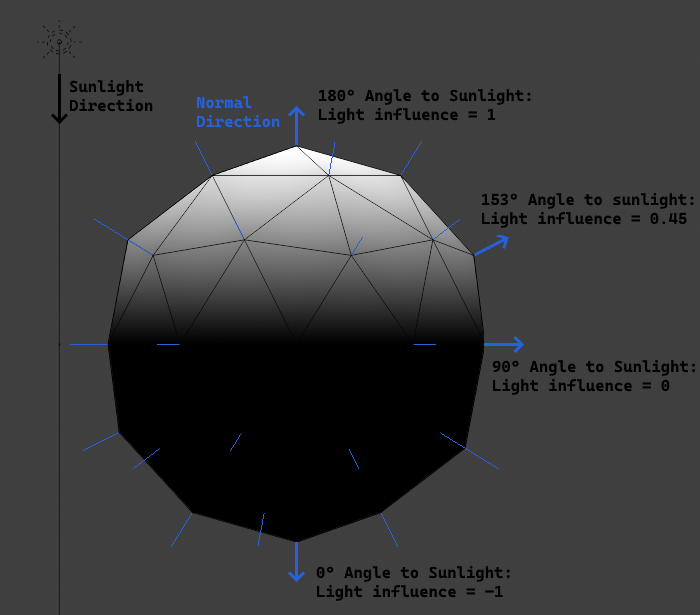
To see how "shaded" a surface is, we check the angle*¹ between the surface normal and the sunlight direction:
- At 180° (“facing the sun”) the surface has a light influence of 1 and receives no shading.
- The closer we get to a 90° angle, the lower the light influence.
- At 90° we have a light influence of 0 and the surface is fully “shaded”.
- Angles between 90° and 0° have a negative light influence that gets rounded up to 0.
Manipulating normals using textures
This is where normal mapping comes into play: We can create an image where each pixel stores a normal that we can “add” to the normal on a surface! This way we can alter normals in between vertices, instead of just interpolating the normals between vertices.
A normal map uses each color channel to encode the components of a normal vector, where the value range from -1 to 1 gets remapped to the color channel range from 0 to 1 with the following mapping:
| Channel | Axis | Direction (0->1) |
|---|---|---|
| Red | X+ | Left->Right |
| Green | Y+ | Down->Up |
| Blue | Z+ | Backward->Forward |
The default color, at which a normal map does not alter the surface normal, is #8080FF (the color code for {0,0,1}).
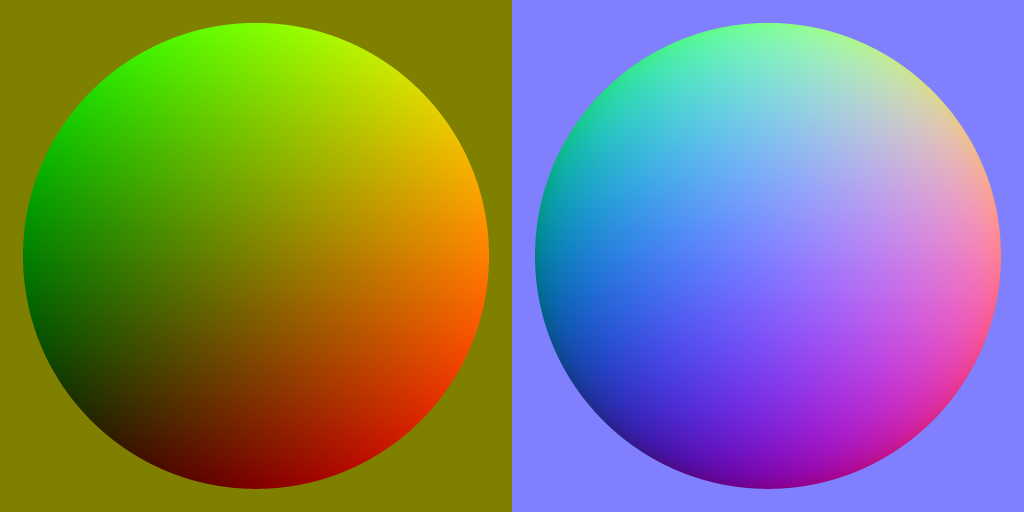
Blender’s standard normal map node requires the blue channel to be provided by the input, whereas Hedgehog Engine games don’t, as they derive the blue channel based on the red and green channels while rendering.
This works because, as mentioned above, a normal direction has to be a unit vector.
If the X and Y components sampled from a normal map are not a unit away from the origin, then the engine calculates a Z component that makes the normal a unit vector.
| Formula for calculating the blue channel |
|---|
B = sqrt(1 - ((R * 2 - 1)² + (G * 2 - 1)²)) * 0.5 + 0.5
R = Red |
Tangent Space
Normal maps come with a big issue: What is considered “up/down” and “left/right”? All we know without a doubt is that “forward/backward” is based on the normal that we want to add to, but how do we correctly apply the normal map?
This is where tangent space becomes relevant: The tangent of a normal points to the “right” of the normal (and the “binormal” would be perpendicular to the normal and tangent).
However, obtaining the tangent is a bit complicated. In the early days of normal maps, there was no consistent way to get a tangent, and there were many different ways to do so.
The naive answer would be to just take whatever direction “right” is in object space, which would work as long as all normal maps are facing perfectly upwards, but the moment a texture gets slightly rotated, the lighting looks very off.
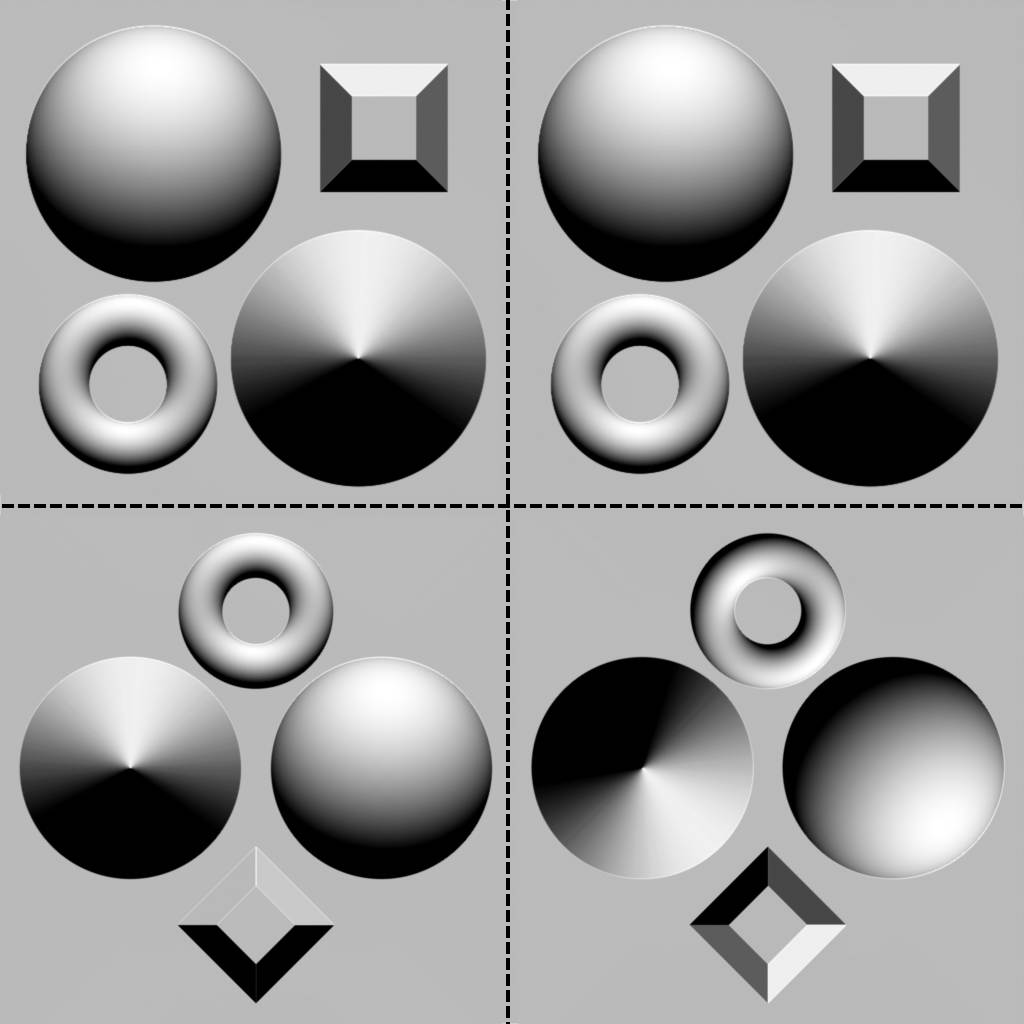
Fortunately nowadays most 3D software (including blender and Hedgehog Engine 2) uses “MikkTSpace”, which was introduced in 2011 and bases the tangent off the texture coordinates, which also automatically aligns the tangent with how a standard normal map would be used.
The easiest way to visualize MikkTSpace (Short for "Mikk tangent space") is by using a texture that shows “up” and “right” and displaying those via a material:
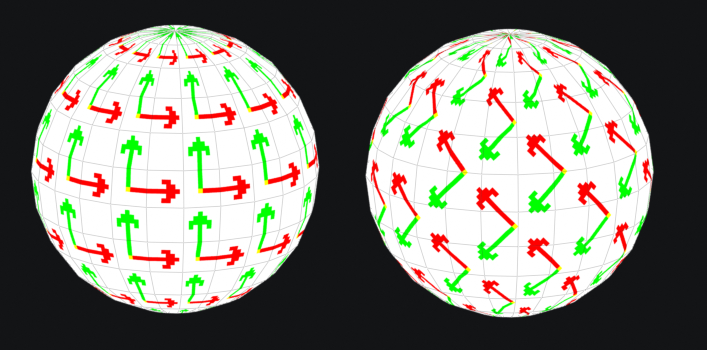
Older games may have used normals that depended on the non-standard tangents, and can thus look weird after importing. Unfortunately, blender supports no way of importing tangents or modifying them beyond being calculated.
Creating normal maps
There are 2 primary ways by which normal maps are created:
Height mapping
Height maps are exactly what the name implies: a texture depicting a height. We can use such a height map to generate a normal texture:
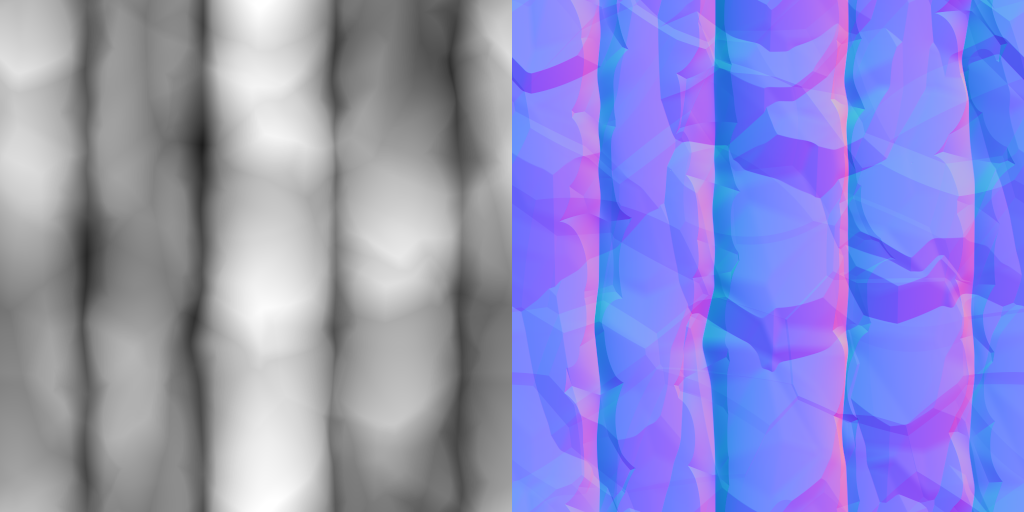
There exist many tools to create normal maps from height maps, such as
You can even use heightmaps in blender directly using the Bump node.
Baking
Blender and other 3D software provide a feature called “texture baking” with which you can project normals from a more detailed mesh onto a simpler one and save it to an image.
You can read more about texture baking in blender here.
